


I’m always hunting for hairstyles that look way more complicated than they actually are. You know what I mean — those looks that make people ask “did you go to the salon?” when you literally just twisted some hair around. After years of experimenting (and plenty of YouTube fails), I’ve figured out which styles are genuinely beginner-friendly and which ones require a bit more patience.
Here’s my ranking of 12 gorgeous hairstyles from the easiest 2-minute fixes to the ones that’ll take you a relaxing Sunday afternoon. I’ve included time estimates and skill ratings so you can pick what works for your schedule and comfort level.
1. Beginner Friendly: Low-Twist Ponytail

Difficulty: ⭐ (1/5) | Time: 2 minutes | Tools: Hair elastic, bobby pins
This is my go-to when I’m running late but still want to look put-together. You literally just twist two front sections back and secure with a low ponytail. The twist adds that little something special that elevates a basic pony.
Start by parting your hair where it naturally falls. Take a section from each side of your head (about temple-width) and gently twist them back. Cross them over each other at the nape and secure everything in a low ponytail. Pull a few face-framing pieces loose if you want it softer.
2. Beginner Friendly: Messy Top Knot

Difficulty: ⭐ (1/5) | Time: 3 minutes | Tools: Hair elastic, bobby pins
The messier this looks, the better. I actually get more compliments when I do this style half-asleep in the morning than when I spend time perfecting it. There’s something so effortless and chic about a slightly undone knot.
Flip your head upside down and gather all your hair into a high ponytail — but don’t pull it tight. On the last loop of your elastic, only pull the hair halfway through, creating a loop. Twist that loop and wrap it around the base, securing with bobby pins wherever it feels loose.
3. Easy Level: Half-Up Twist

Difficulty: ⭐⭐ (2/5) | Time: 5 minutes | Tools: Bobby pins, texturizing spray
Perfect for when you want your hair down but need it out of your face. I love how this works on both straight and wavy hair — it actually looks better with a little texture, so don’t stress about making it perfect.
Section off the top half of your hair from ear to ear. Tease this section gently at the roots for volume, then twist it loosely and pin it at the back of your head. Let some shorter pieces fall out naturally — that’s what makes it look effortless rather than forced.
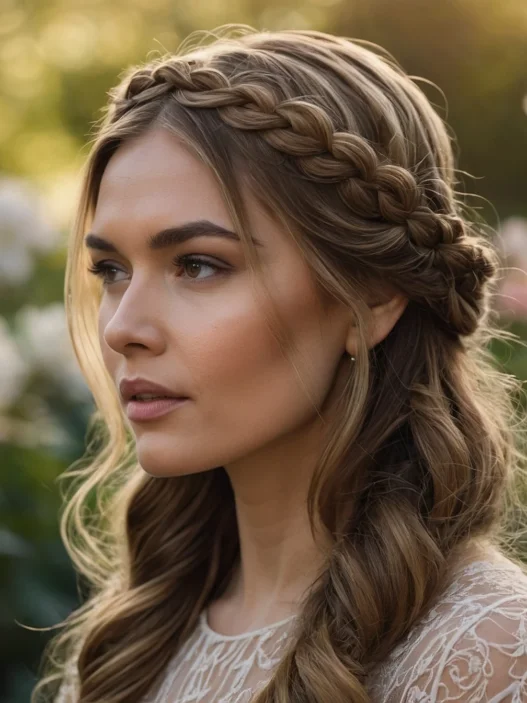
4. Easy Level: Braided Crown

Difficulty: ⭐⭐ (2/5) | Time: 7 minutes | Tools: Bobby pins, clear elastics
This one makes me feel like a bohemian princess. It’s basically just two simple braids that you pin across the top of your head, but the effect is so pretty and romantic. Great for festivals, brunches, or any time you want to feel a little whimsical.
Part your hair down the middle and braid a small section from each side, starting at your hairline. The braids don’t need to be tight or perfect — loose looks more natural. Cross them over the top of your head and pin each braid end behind the opposite ear, tucking the ends under.
My personal favorite from this whole list? Number 7 — the Dutch braid ponytail. It looks so intricate but once you get the hang of the Dutch braid technique, it’s actually really relaxing to do. Plus it stays put all day, which my fine hair definitely appreciates.
5. Easy Level: Low Bun with Face-Framing

Difficulty: ⭐⭐ (2/5) | Time: 6 minutes | Tools: Hair elastic, bobby pins, curling iron (optional)
This is my professional meeting hairstyle. It’s polished enough for important occasions but still has movement and softness around the face. The key is leaving those front pieces out — they make all the difference between “uptight” and “put-together.”
Before you start, curl or wave the pieces that will frame your face. Then gather the rest of your hair into a low ponytail, twist it loosely, and wrap it into a bun. Don’t make it too tight — you want some texture and volume. Secure with bobby pins and gently tug at the bun to loosen it slightly.
6. Intermediate Level: Side-Swept Beach Waves

Difficulty: ⭐⭐⭐ (3/5) | Time: 15 minutes | Tools: Curling iron or wand, texturizing spray, heat protectant
These aren’t technically an “updo” but they’re so versatile and gorgeous that I had to include them. The trick is knowing how to make waves look lived-in rather than too done. I learned this from watching professional styling tutorials and it changed my whole approach.
Apply heat protectant and texturizing spray to damp hair. Using a 1.5-inch curling iron, curl random sections in different directions — some toward your face, some away. Don’t curl every piece of hair, and vary the sizes of your sections. Once cool, scrunch gently and sweep everything to one side with a deep part.
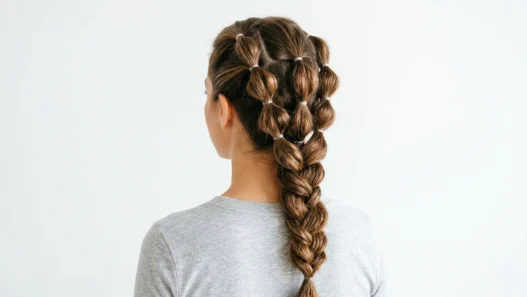
7. Intermediate Level: Dutch Braid Ponytail

Difficulty: ⭐⭐⭐ (3/5) | Time: 12 minutes | Tools: Hair elastic, bobby pins
Once you master the Dutch braid (which is just an inside-out French braid), this becomes so satisfying to do. It’s like a regular ponytail’s cooler, more interesting sister. Perfect for workouts because everything stays exactly where you put it.
Start a Dutch braid at your hairline by crossing sections under instead of over. Braid back about halfway, then secure with a clear elastic. Gather the rest of your hair with the braid tail and secure in a low ponytail. Gently tug at the braid sections to make them fuller and more voluminous.
Watch the Technique
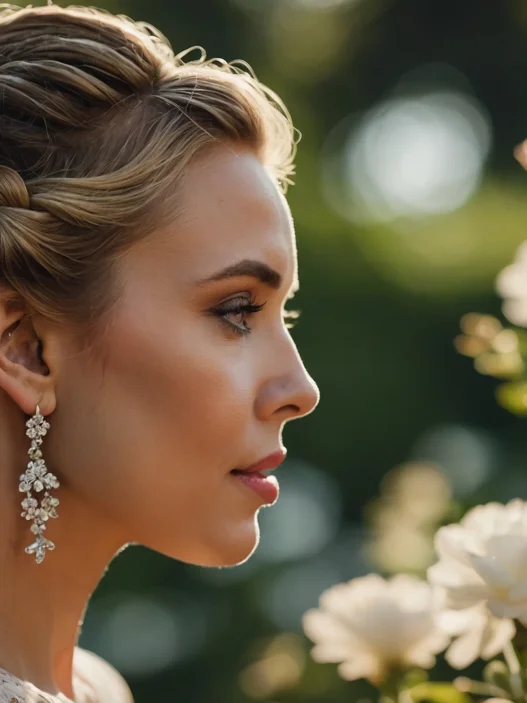
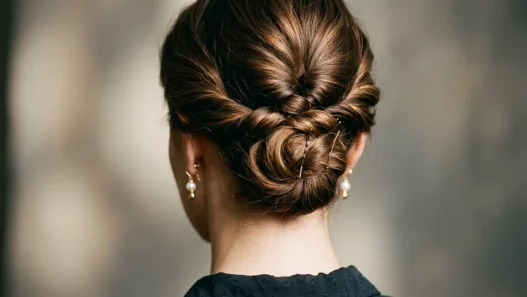
8. Intermediate Level: Twisted Chignon

Difficulty: ⭐⭐⭐ (3/5) | Time: 10 minutes | Tools: Bobby pins, hair elastic, hairspray
This looks so much fancier than it actually is. I love pulling this out for dinner parties or date nights — it has that elegant, timeless vibe that works with everything from jeans to cocktail dresses.
Create a low ponytail and split it into two equal sections. Twist each section in the same direction, then wrap them around each other in the opposite direction. This creates a rope-like texture. Coil this “rope” around the base of the ponytail and pin it in place, tucking the end under.
9. Intermediate Challenge: Fishtail Side Braid
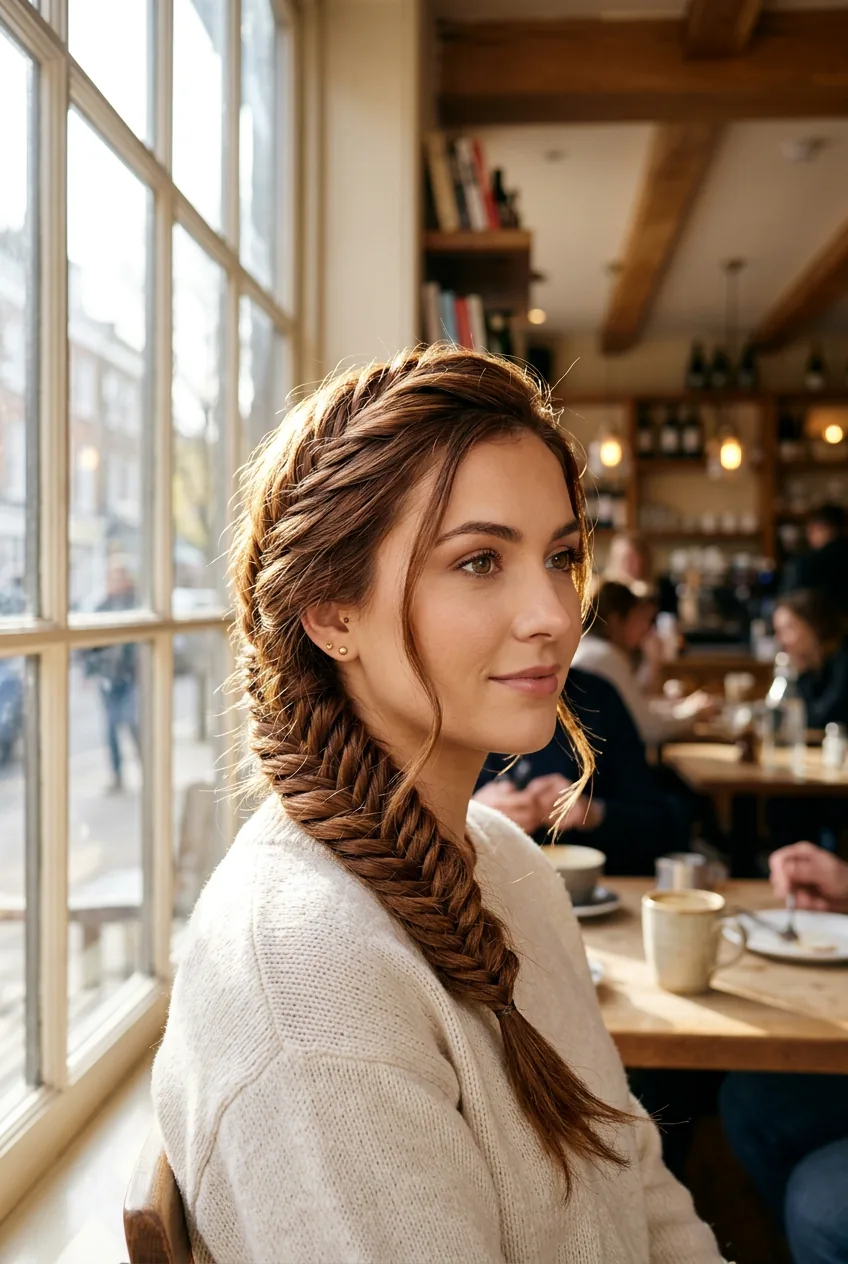
Difficulty: ⭐⭐⭐ (3/5) | Time: 18 minutes | Tools: Hair elastic, bobby pins
Fishtails look incredibly intricate but they’re actually just a pattern of crossing small sections over and over. The key is patience — this one takes time, but it’s oddly meditative once you get into the rhythm. Great for special celebration styles when you want something really eye-catching.
Sweep all your hair to one side and divide it into two equal sections. Take a thin piece from the outside of the left section and cross it over to join the right section. Then take a thin piece from the outside of the right section and cross it to the left. Keep alternating, keeping your sections thin for the best texture.
10. Advanced Level: Waterfall Braid

Difficulty: ⭐⭐⭐⭐ (4/5) | Time: 25 minutes | Tools: Bobby pins, clear elastics, curling iron
This is where we start getting into the “weekend project” territory. The waterfall braid creates this gorgeous cascading effect where pieces of hair seem to flow through the braid like a waterfall. It’s stunning but definitely requires some practice to get the tension right.
Start with a regular three-strand braid at your temple, but here’s the twist: instead of continuing with the same three sections, you drop the bottom section each time and pick up a new piece from below. The dropped pieces become your “waterfall.” Work your way around your head, following your hairline.
11. Advanced Level: Vintage Victory Rolls

Difficulty: ⭐⭐⭐⭐ (4/5) | Time: 30 minutes | Tools: Rattail comb, bobby pins, hairspray, setting lotion
These 1940s-inspired rolls are absolutely gorgeous but they require some serious bobby pin skills. I learned this technique from vintage hair tutorials and honestly, it took me about five tries to get them to look right. But when you nail it? Pure glamour.
Section your hair from ear to ear across the top. Create a deep side part and work on one side at a time. Tease each section heavily, then roll it back toward your face, creating a smooth tube shape. The roll should sit just above your ear. Pin from underneath so the pins are invisible. Repeat on the other side.
12. Advanced Challenge: Multi-Strand Braided Updo

Difficulty: ⭐⭐⭐⭐⭐ (5/5) | Time: 45 minutes | Tools: Multiple hair elastics, bobby pins, texturizing spray
This is the Mount Everest of DIY hairstyles. You’re essentially creating multiple braids and weaving them together into one cohesive updo. It’s the kind of style that makes people assume you went to a salon, but it’s totally doable at home if you’re patient.
Start by creating four to five smaller braids throughout your head — some regular three-strand, maybe one Dutch braid, possibly a fishtail if you’re feeling ambitious. Leave them loose and textured. Then comes the puzzle part: you’ll wrap and weave these braids around each other, pinning as you go to create a full, dimensional updo. Advanced braiding techniques really helped me master this level of complexity.
Questions I Get About These Styles
How long should my hair be for these styles?
Most of these work best on shoulder-length hair or longer, but don’t let that stop you if your hair is shorter. The messy top knot and half-up twist can work on chin-length hair, and you can always fake length with clip-in extensions for special occasions.
What if my hair is really slippery and won’t hold styles?
Texturizing spray is your best friend here. I spray it on damp hair before styling and again on finished sections. Day-old hair actually holds styles better than freshly washed hair, so don’t feel like you need to start with perfectly clean hair.
Should I practice these on clean or dirty hair?
For learning purposes, second-day hair is actually easier to work with because it has more grip and texture. Clean hair can be too slippery when you’re trying to master new techniques. Once you’re comfortable, you can do these styles on any hair day.
How do I make bobby pins stay put better?
This changed my life: spray your bobby pins with hairspray before using them. Also, insert them in an X pattern rather than parallel — they grip so much better that way. And always push them in the opposite direction first, then slide them back the right way.
The beauty of ranking hairstyles by difficulty is that you can work your way up gradually. Start with the beginner styles and build your confidence before tackling the more complex braids. And remember — even the “advanced” styles become muscle memory with enough practice. I still remember the first time I successfully did a waterfall braid without looking at a tutorial. Pure magic.